Documents for Health Insurance Claim: Cashless and Reimbursement Checklist
Know which documents for a health insurance claim you need for cashless hospitalisation and reimbursement in India. Get checklists, a step-by-step flow, a cashless vs reimbursement table and the top reasons claims are rejected.
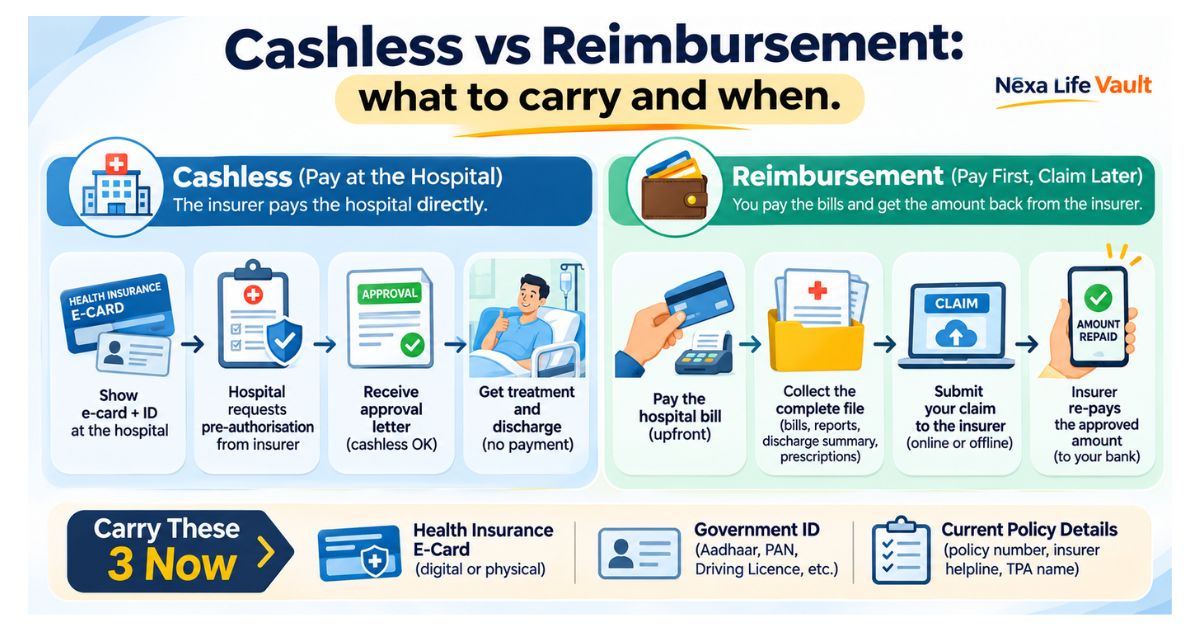
For a cashless claim, you need your insurance e-card, a photo ID such as Aadhaar, and the doctor's admission advice, which the hospital's insurance desk sends to the insurer for approval. For reimbursement, you also need the signed claim form, original bills, discharge summary, reports, prescriptions and payment receipts.
It is 11 pm. A family member is being admitted, the insurance desk wants your policy card and ID, and the policy PDF is buried somewhere in an old email. Having the right documents for a health insurance claim ready before you need them saves time at the hospital counter and avoids delays later. This guide covers both routes used in India, cashless and reimbursement, with checklists, a step flow and the reasons claims get rejected.
Last updated: November 2026
This is general information, not legal, tax or financial advice. Policy terms differ by insurer and plan. Verify with your policy wording and the Insurance Regulatory and Development Authority of India (IRDAI) at irdai.gov.in before acting.
What is the difference between a cashless claim and a reimbursement claim?
In a cashless claim, your insurer (or its third-party administrator, called a TPA) settles the eligible bill directly with the hospital. You pay only what the policy does not cover, such as non-payable items, a co-payment or a deductible.
In a reimbursement claim, you pay the hospital first and send your papers to the insurer afterwards. The insurer reviews them and repays the eligible amount.
| Point | Cashless claim | Reimbursement claim |
|---|---|---|
| Who pays the hospital | Insurer or TPA, directly | You, then the insurer repays you |
| Where you can be treated | Network hospitals only | Any hospital that meets your policy's conditions |
| Approval | Pre-authorisation at or before admission | Claim reviewed after discharge |
| Documents needed | A short set at admission, final bill papers at discharge | A full file after discharge |
| Your upfront cost | Usually non-payable items, co-payment or deductible | The whole bill until the claim is paid |
| Best when | The hospital is in the network or the procedure is planned | The hospital is outside the network or cashless is declined |
The real difference is the paperwork. Cashless needs a small set of papers at the start. Reimbursement needs a complete file at the end.
Which documents do you need for cashless hospitalisation?
Keep these ready when you reach the hospital's insurance desk, sometimes called the TPA desk:
- Health insurance e-card or policy number. If your insurer works through a TPA, the TPA ID card is needed too.
- Government photo ID of the patient. Aadhaar, passport, driving licence or voter ID is commonly accepted.
- Pre-authorisation form. This is the request sent to the insurer. The hospital usually supplies and fills in its part.
- Doctor's admission advice. It should state the diagnosis, the planned treatment and the expected length of stay.
- Supporting reports. Blood tests, scans or other investigations that back up the diagnosis.
- Earlier medical records, if the condition is old. For example, past prescriptions for diabetes or a heart condition.
- Accident details, if relevant. Some cases also need a police report or medico-legal case (MLC) papers.
The hospital prepares most of the pre-authorisation form. Your part is the card, the ID and the signatures. If you want the full list of papers worth keeping on file all year, see our health insurance documents checklist.
How does the cashless process work, step by step?
- Check the network. Confirm the hospital is on your insurer's network list through the insurer's app, website or helpline.
- Request pre-authorisation. For a planned procedure, ask the hospital's insurance desk to send the request before admission. For an emergency, get admitted first and let the desk inform the insurer. Check your policy for the time limit on emergency intimation.
- Submit your documents. Hand over the e-card, photo ID and the doctor's advice. Sign where the desk asks.
- Wait for the insurer's review. The insurer or TPA may ask for more information. Reply quickly, since a pending query can hold up approval.
- Read the approval letter. Approval can cover less than the estimate. Note the approved amount and any items excluded.
- Settle at discharge. The hospital sends the final bill to the insurer. You pay non-payable items and any co-payment or deductible.
- Collect your copies. Take the discharge summary, final bill, approval letter and receipts before you leave.
If cashless is declined, you can usually pay the bill and file for reimbursement instead. Ask the insurer to give the reason for the decline in writing. In an emergency, a ready note with blood group, allergies and current medicines helps the care team and the desk. Our emergency health information guide shows how to set one up.
Which documents for health insurance claim reimbursement should you collect?
Reimbursement is paper-heavy. Collect each item before you leave the hospital, because getting them later can mean repeat visits.
- Duly filled and signed claim form. Use your insurer's own form. It often has a section for you and a section for the hospital.
- Policy number and e-card copy.
- KYC documents. Photo ID and address proof, such as Aadhaar. Some insurers also ask for PAN.
- Final hospital bill with item-wise breakup. A lump-sum bill is a common reason for queries.
- Payment receipts. These prove you paid the hospital.
- Discharge summary. It lists the diagnosis, treatment given and condition at discharge.
- Doctor's prescriptions and admission note.
- Investigation reports and the matching bills. Lab tests, X-rays, MRI or CT scans.
- Pharmacy bills with matching prescriptions. A medicine bill without a prescription is easy to dispute.
- Implant details. For surgeries involving a stent, lens or joint implant, keep the sticker and invoice.
- Bank details. A cancelled cheque or bank statement page showing the account holder's name.
- Pre- and post-hospitalisation bills. Include them only if your policy covers those periods.
- Accident papers. An FIR or MLC copy where it applies.
Pro tip: Before you leave the billing counter, photograph every page of the final bill, discharge summary and receipts. Then check that the patient's name, spelling and dates match your policy exactly. A mismatch between documents can trigger a query and slow the whole claim.
Here is how a small gap turns into a big delay. Ravi's mother has cataract surgery. He pays the bill and files for reimbursement a week later. The insurer asks for the lens sticker, which the hospital never handed over. Ravi spends days calling the hospital for one small paper. Asking for it at discharge would have taken a minute.
Do some treatments need extra documents?
Yes. The basic set above covers most hospital stays, but these cases often need more. Your policy wording has the exact list.
- Accidents: an FIR or MLC copy, and a short description of how the injury happened.
- Planned surgery: the doctor's advice and estimate sent well before admission.
- Day-care procedures: the same bills and reports, plus proof that the procedure is on your policy's day-care list.
- Maternity: antenatal records and the birth details, if your plan covers maternity.
- Long-running illness: older prescriptions and test reports that show when the condition began.
Why do health insurance claims get rejected?
These are the common claim rejected reasons, with the fix for each:
- Missing or unsigned documents. Check every form for signatures and dates before submitting. Send clear scans, not blurry photos.
- Mismatched details. Names, dates or ages that differ between the bill, the discharge summary and the policy raise doubts. Compare them before you file.
- Late intimation or late filing. Policies set time limits for informing the insurer and for submitting papers. Read those limits now, not during a crisis.
- Pre-existing condition not disclosed. If an illness was left out on the proposal form, the insurer may reject the claim. Declare your health history honestly at purchase and renewal.
- Waiting period not complete. Some illnesses and procedures are covered only after a set waiting period. Check these before planned treatment.
- Treatment excluded in the policy. Cosmetic procedures and certain other treatments are commonly excluded. Read the exclusions list.
- Policy lapsed. A missed renewal or unpaid premium can leave you with no cover on the day you need it. Track your renewal date.
- Admission not considered necessary. If the insurer decides the treatment could have been done without admission, it may decline. Ask the doctor to state clearly why admission was needed.
What can you do if your claim is rejected?
- Read the rejection letter and ask the insurer for the exact reason in writing.
- If the reason is missing papers, send them and ask the insurer to reconsider.
- If you disagree with the decision, write to the insurer's grievance officer.
- If that fails, you can escalate through IRDAI's grievance channel and then to the Insurance Ombudsman.
Verify the current grievance process and time limits with IRDAI (irdai.gov.in) and the Council for Insurance Ombudsmen before acting.
How Nexa Life Vault helps
The Health Vault gives you one place for your policy copy, e-card, prescriptions, test reports, discharge summaries and hospital bills. When the insurance desk asks for a paper, you are not searching through email and WhatsApp.
The feature that matters most here is Smart Document Alerts. Add your policy's renewal date and you get a reminder before it lapses. A lapsed policy is one of the avoidable reasons for rejection. You still need to keep original bills where your insurer asks for them.
Keep your claim documents ready
A claim goes smoothly when the paperwork is right the first time. Know which documents for a health insurance claim your route needs, check names and dates match, and ask for every paper before you leave the hospital. Spend ten minutes today gathering your policy, e-card and ID in one place. Keep claim documents ready, so the next hospital visit is about care, not searching for papers.
Frequently Asked Questions
Vishal Singh
Full-Stack Developer & Systems Contributor
Full-stack developer at NexaLifeVault specializing in secure web applications, data encryption standards, and digital legacy preservation systems.
Share this post
Comments (0)
No comments yet. Be the first to comment!